The ultimate guide to setting up Google Translate’s glossaries in JavaScript

In this article, I’m going to teach you how to easily set up Google Translate V3’s glossary feature, in JavaScript, to improve the translations you are getting from Google Translate.
It was a painful process for me since Google's documentation https://cloud.google.com/translate/docs/advanced/glossary was missing several important steps, so I wrote this walkthrough so you don’t waste time running into the same issues.
Github link for completed code
If you’d like to just see the completed code for this guide, here is a github link https://github.com/swekage/google-translate-glossary. However, if you still want a walkthrough of the steps, continue on!
Is this article for you?
This article is for you if…
you’re a developer trying to set up Google Translate glossaries, but getting stuck and frustrated, and need some help
you’re a developer that finds Google’s documentation too confusing and wishes there was something easier to follow
you’re my mom and you just want to read the article to support me. ty mom.
otherwise, this article may not be for you, and no worries if you want to click away!
What is a glossary anyway?
Just in case you don’t know, a Google Translate glossary is just a table where you list out all the terms you want to translate yourself rather than let Google translate automatically.
Why do we need this? Well, sometimes Google Translate makes mistakes.
For example, when we try to translate “URL slug” into Spanish, Google Translate will give us “babosa de URL”, which literally refers to the animal slug!!
Another example is if you try to translate a product name like “Google Home” into Spanish, and Google Translate gives you back “Página principal de Google”.
These little mistranslations can add up and really hurt your customers’ perception of your website and worst case, your customer loses trust and decides to go with your competitor!
This is where glossaries come in. Here’s an example of one:
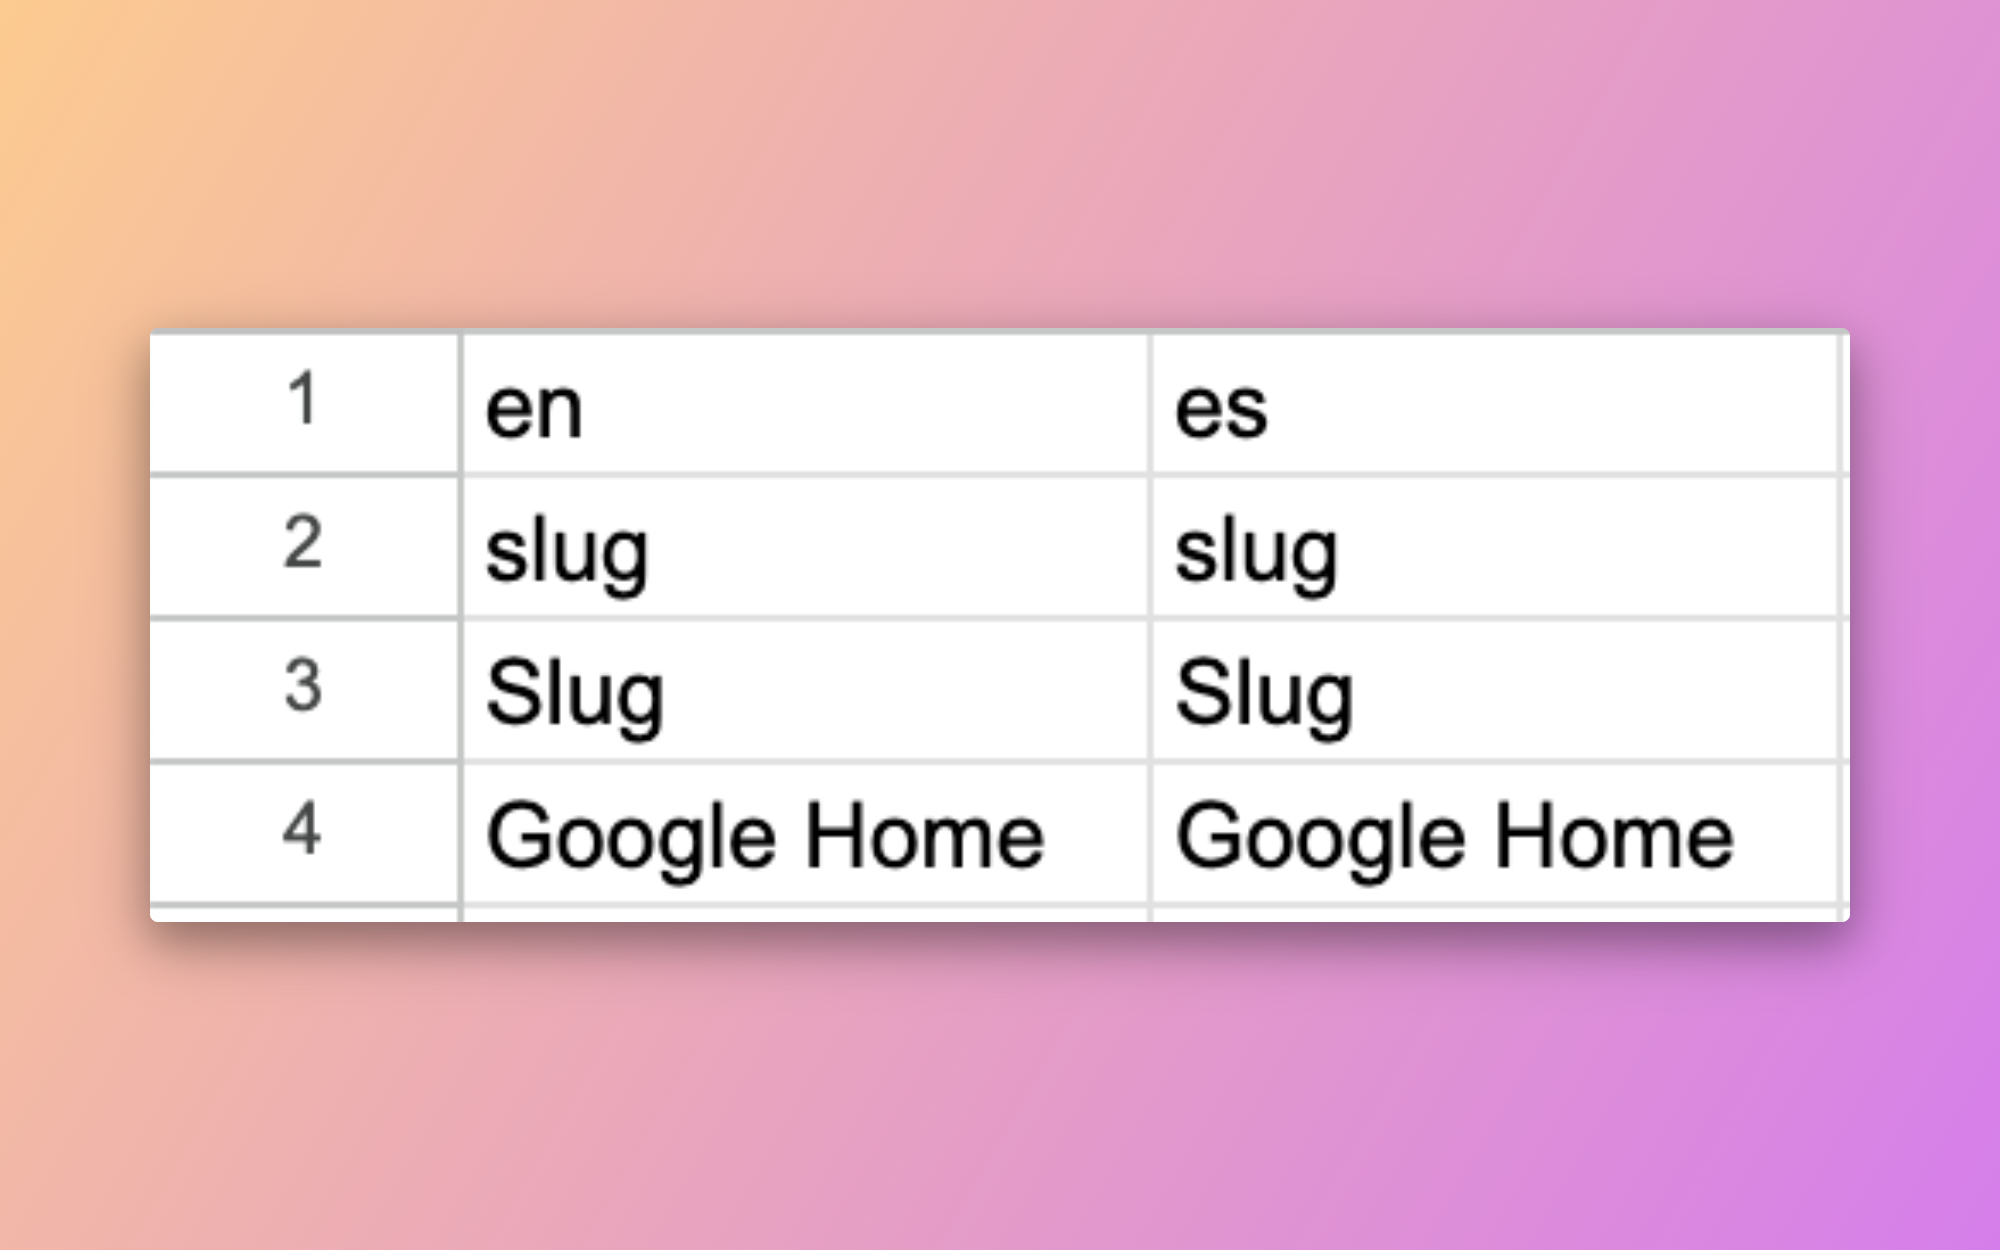
In the above glossary, we are telling Google Translate that when we are trying to translate from English to Spanish, and we see the terms “slug”, “Slug” or “Google Home”, to use the translations provided by the glossary.
Notice that I added both “slug” and “Slug”. This is because glossaries by default are case-sensitive, meaning they treat lowercase and uppercase as different terms.
Now that we know what glossaries are used for, the next step is to make sure you’ve done everything you need to get started!
Do this before you start (~5 minutes)
Abe Lincoln said that if you gave him 6 hours to cut a tree, he would spend 4 hours sharpening the axe. We’re going to do something similar, except we aren’t going to be cutting trees. We’re just moving our mouse and typing on our keyboard. And it won’t take 6 hours if you follow my guide.
Make sure you do all of these before moving on!
Sign into Google Cloud Console https://console.cloud.google.com
Create a project https://console.cloud.google.com/projectcreate
Enable the Cloud Translation API in that project https://console.cloud.google.com/marketplace/product/google/translate.googleapis.com
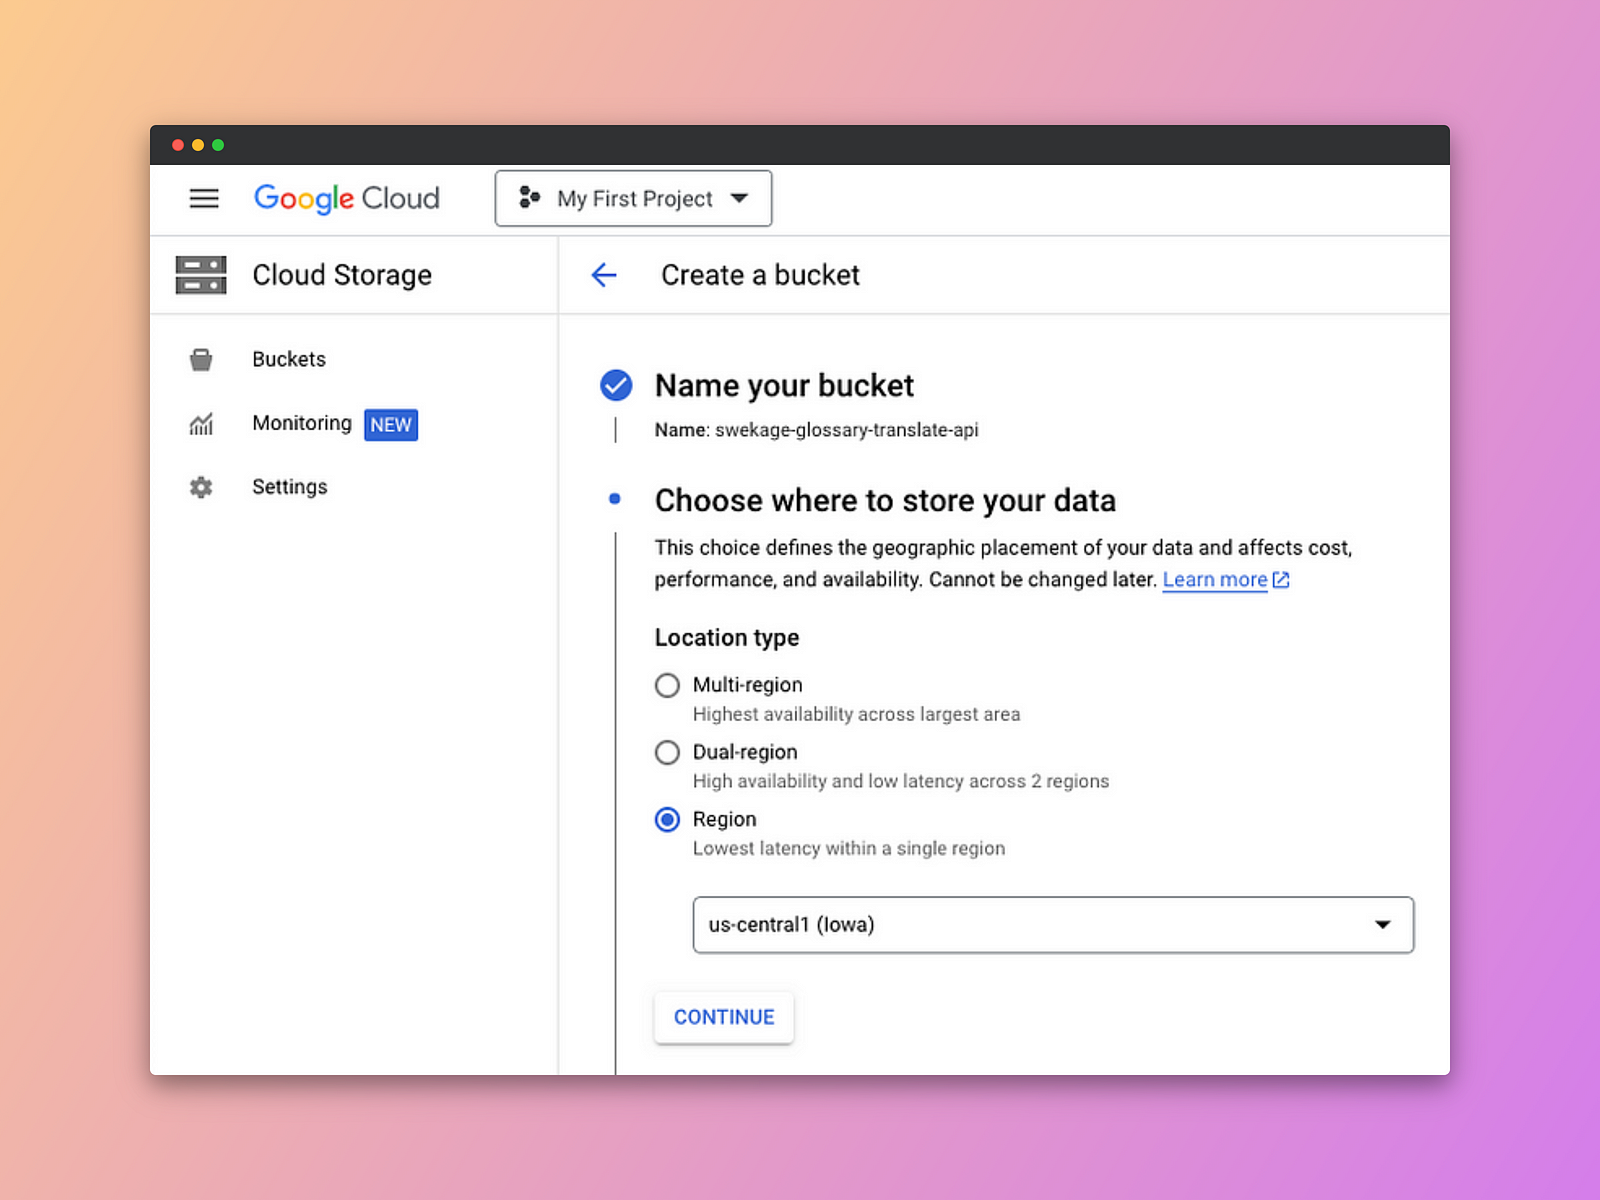
Create a Cloud Storage bucket. IMPORTANT: You must set the region of the bucket to be us-central1 (Iowa). Nothing else will work. Not multi-region, not us-east1. It must be us-central1(Iowa). I spent many hours wondering why it wasn’t working, and finally found out why here: https://cloud.google.com/translate/docs/migrate-to-v3#resources_projects_and_locations Default settings for everything else is just fine.
Breakdown of steps
Great! Let’s start chopping up that tree!

Here’s an outline of the remaining steps!
Create and download service account credentials (5 minutes)
Create glossary.csv file and upload to Google Cloud Storage (3 minutes)
Create the glossary resource so Google Translate can use it. (5 minutes)
Call Google Translate with the glossary. (5 minutes)
Bonus: What if I need to make changes to the glossary? (5 minutes)
Create and download service account credentials (5 minutes)
Google Translate v3 and the glossary requires your computer to have service account credentials to authenticate requests. They used to allow just using an API Key but that was deemed not secure enough.
To create these credentials, go to Service Accounts, and click Create Service Account. https://console.cloud.google.com/iam-admin/serviceaccounts
Fill out the Service account name and description. Example provided below.

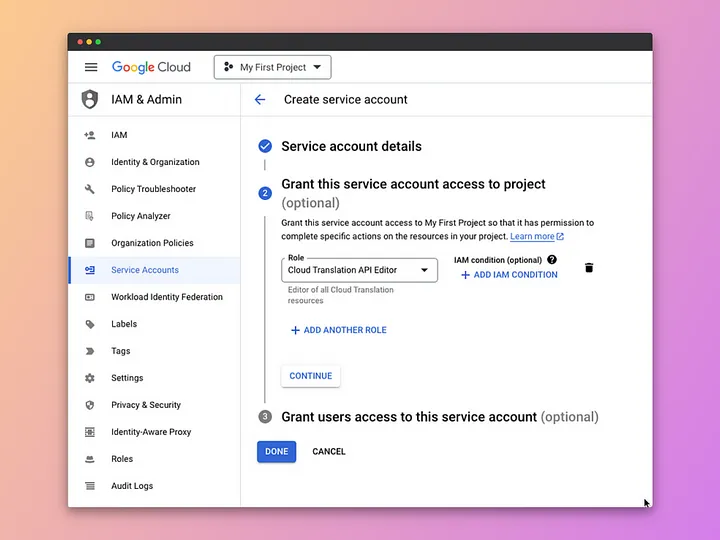
Give the service account access to “Cloud Translation API Editor” like the screenshot below.
In step 3, give yourself admin access to the service account so you can manage it. Click Done to successfully create the service account.
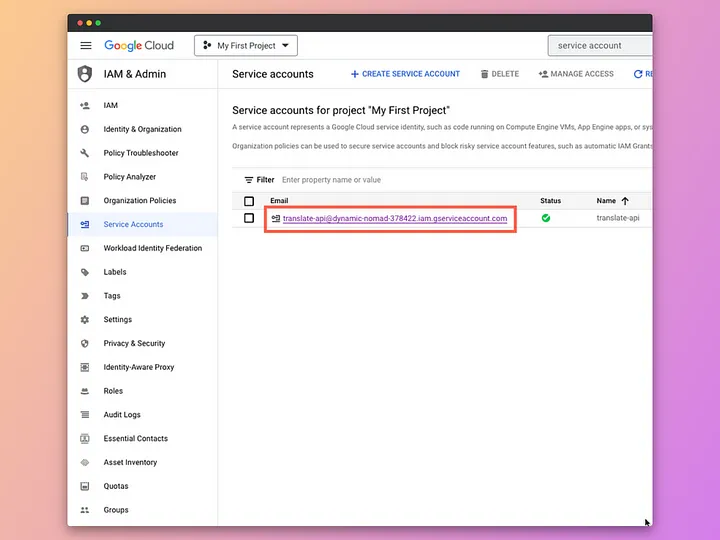
To download the service account credentials you need, on the main Service Accounts page, click the service account that you just created.
And then go to the Keys tab. In there, click Add Keys, and then specify to Create new key.

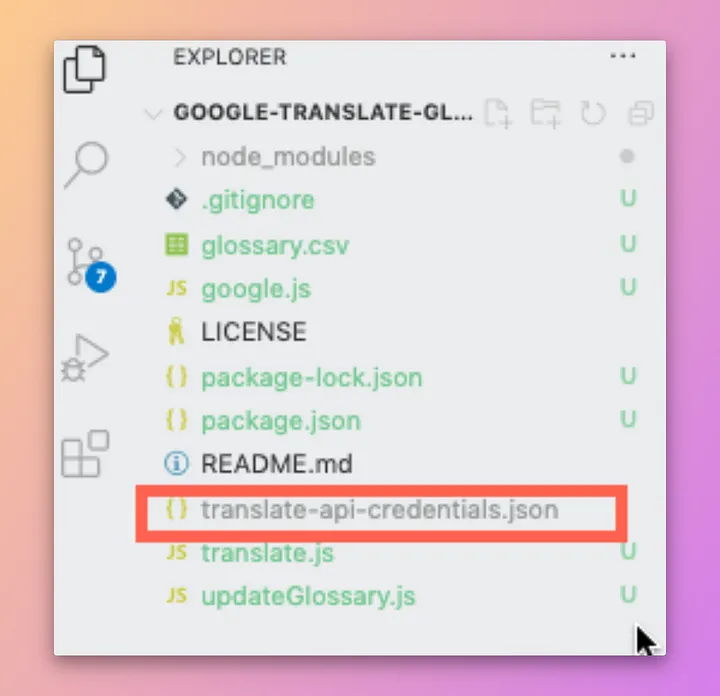
Choose JSON in the next popup window, and save the file they give you on your computer anywhere, as long as you remember where it is later. For this guide, I recommend naming it translate-api-credentials.json and placing it in the root of your project folder, and adding it to the .gitignore file so it doesn’t end up in version control.
Right now, those credentials authorize you to call the Google Translate service from your computer since you added that role before, but we also need to allow it to access the Google Cloud Storage bucket you created before.
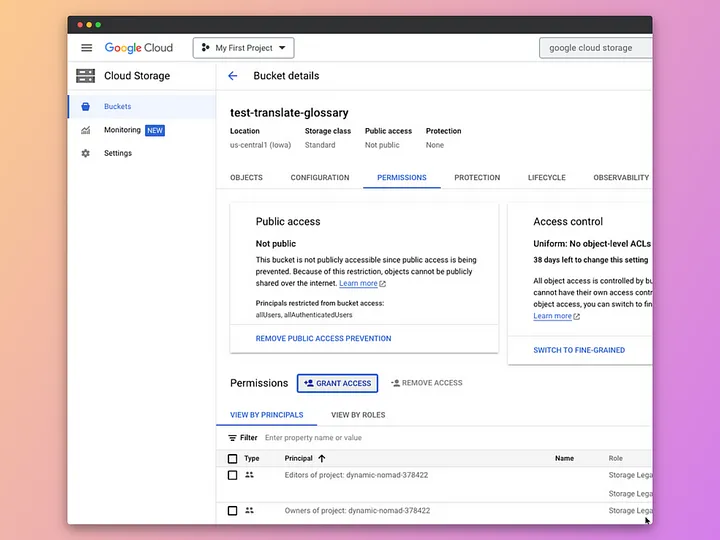
Head over to the Cloud Storage page, and click the bucket you created before. Go to the Permissions tab, and then click Grant Access.
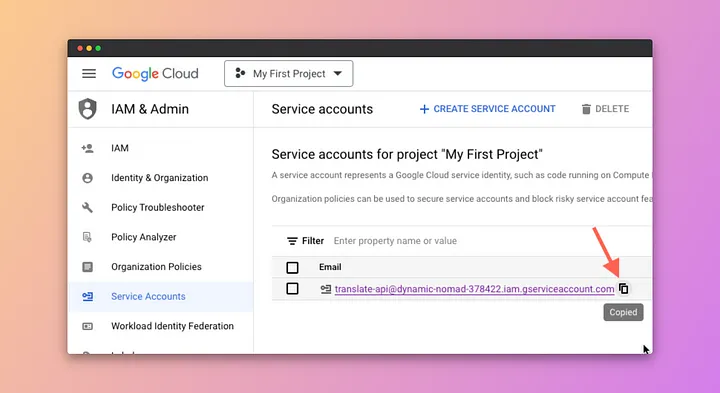
In the panel that pops up, where it says New principal, copy and paste in your new service account’s email and click on the suggested item. To get your service account’s email, you can go back to Service Accounts and copy it from there.
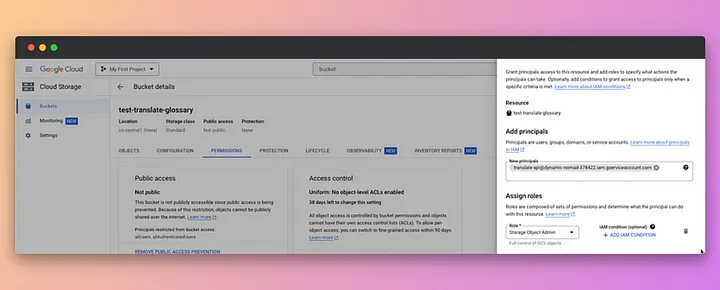
Then, going back to the panel before, in the Role field, you can put Storage Object Admin. By the end, it should look like this:
Congrats! You’ve finished setting up the Service Account. Now let’s make that glossary.csv file.
Create glossary.csv file and upload to Google Cloud Storage (3 minutes)
Google offers two types of glossaries. Unidirectional, or Equivalent Terms.
Here’s an example of a Unidirectional glossary.
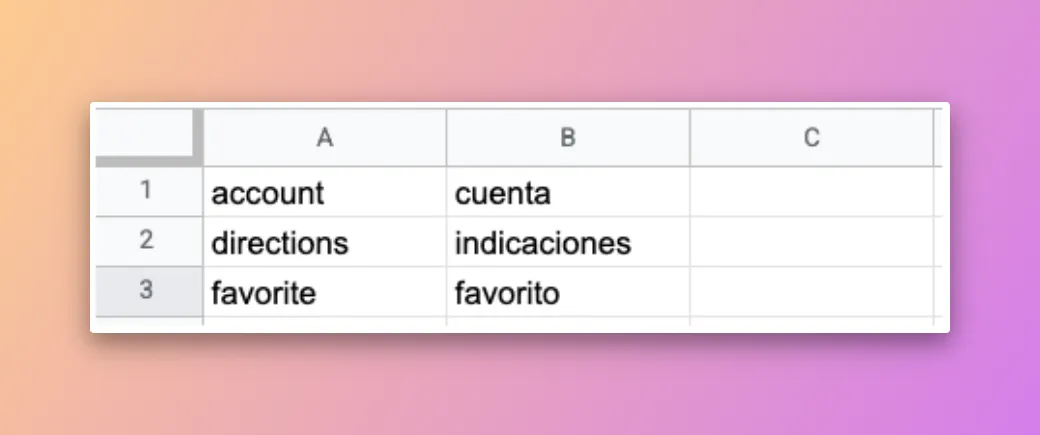
This glossary file can only be used for translating one way from English to Spanish. You cannot automatically translate from Spanish to English, and if you did, you would add another glossary file where column A has the Spanish words, and column B has the English words. If you want to read more, here’s a link to the Google documentation https://cloud.google.com/distributed-cloud/hosted/docs/ga/gdch/application/ao-user/vertex-ai-glossary#UNIDIR
Here’s an example of an Equivalent Terms glossary.
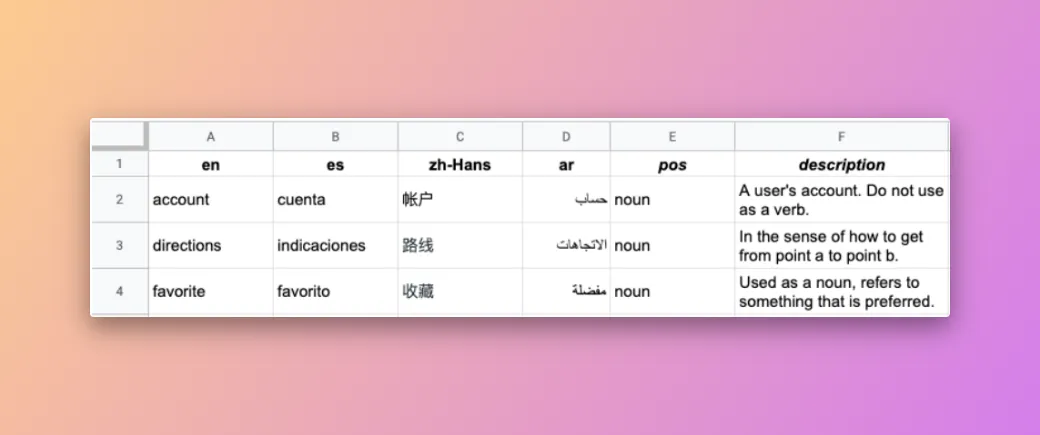
Notice that the first row has language codes. For all the supported language codes, Google lists them here https://cloud.google.com/translate/docs/languages.
This type of glossary allows you to translate both from English to Spanish, from Spanish to Arabic, and Arabic to English. The pos and description columns are optional, and just exist to give extra context to other humans. Google Cloud doesn’t do anything with those. For more info about Equivalent Terms glossaries, here’s a link to the Google documentation. https://cloud.google.com/distributed-cloud/hosted/docs/ga/gdch/application/ao-user/vertex-ai-glossary#EQUIVTERMSETS
My Recommendation
I think for most people using Google Translate API, where they are probably trying to translate the text in their app to many different other languages, Equivalent Terms is the simplest to set up and serves your needs well.
Here is a template glossary.csv file that you can clone and use. https://docs.google.com/spreadsheets/d/10nEcORv0VotvHyvLBNYJaZiuMn0E_ACcjdrig-Z-vsA/edit?usp=sharing
Remember to download it as a .csv file! And rename it to glossary.csv
You can place this in your project root directory as well, just like your service account credentials. This way, any changes to it can be tracked with version control and go through your standard pull request process!
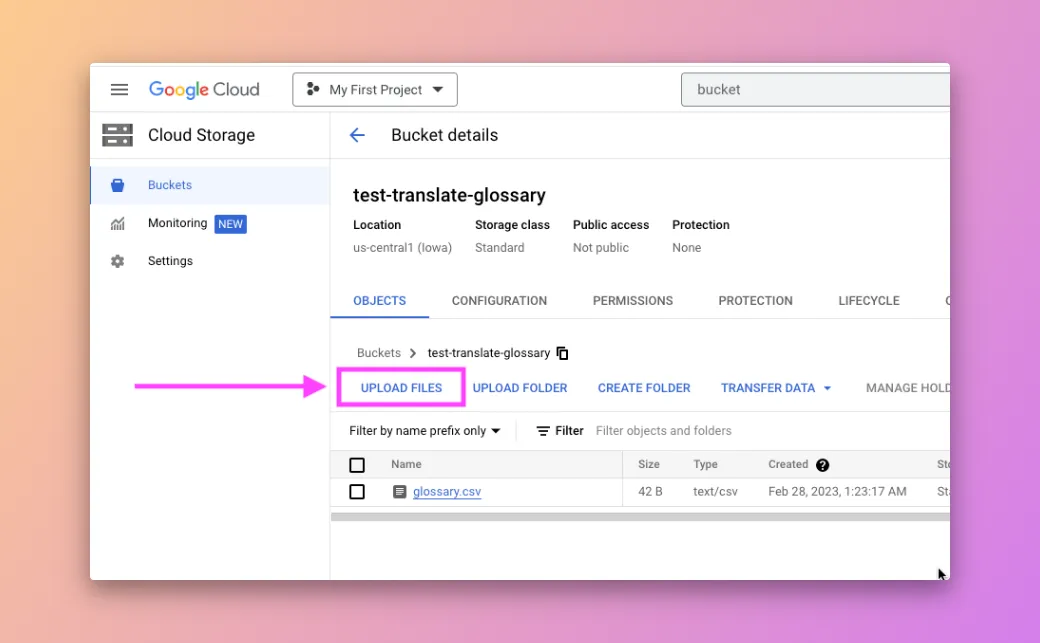
You’re now going to upload this to the Cloud Storage bucket you made before. You can go to the bucket you made before, and then click Upload Files like so:
If you’d like to automate this, you can also do it like so:
const path = require('path');

// this is where you decided to download your service account credentials
const SERVICE_ACCOUNT_CREDENTIALS = path.resolve('./translate-api-credentials.json');

// You must set this environment variable before you require the
// @google-cloud npm modules to authorize properly
process.env.GOOGLE_APPLICATION_CREDENTIALS = SERVICE_ACCOUNT_CREDENTIALS;
const { Storage } = require('@google-cloud/storage');

// insert your own PROJECT ID and BUCKET_NAME here
// const PROJECT_ID = 'PROJECT_ID';
const PROJECT_ID = 'dynamic-nomad-378422';
const BUCKET_NAME = 'test-translate-glossary';

const storage = new Storage({
  projectId: PROJECT_ID,
});

async function uploadNewGlossaryFileToBucket() {
  console.log('Uploading glossary.csv to bucket...');
  await storage.bucket(BUCKET_NAME).upload(path.resolve('./glossary.csv'));
  console.log(`Uploaded successfully to ${BUCKET_NAME}!`);
}
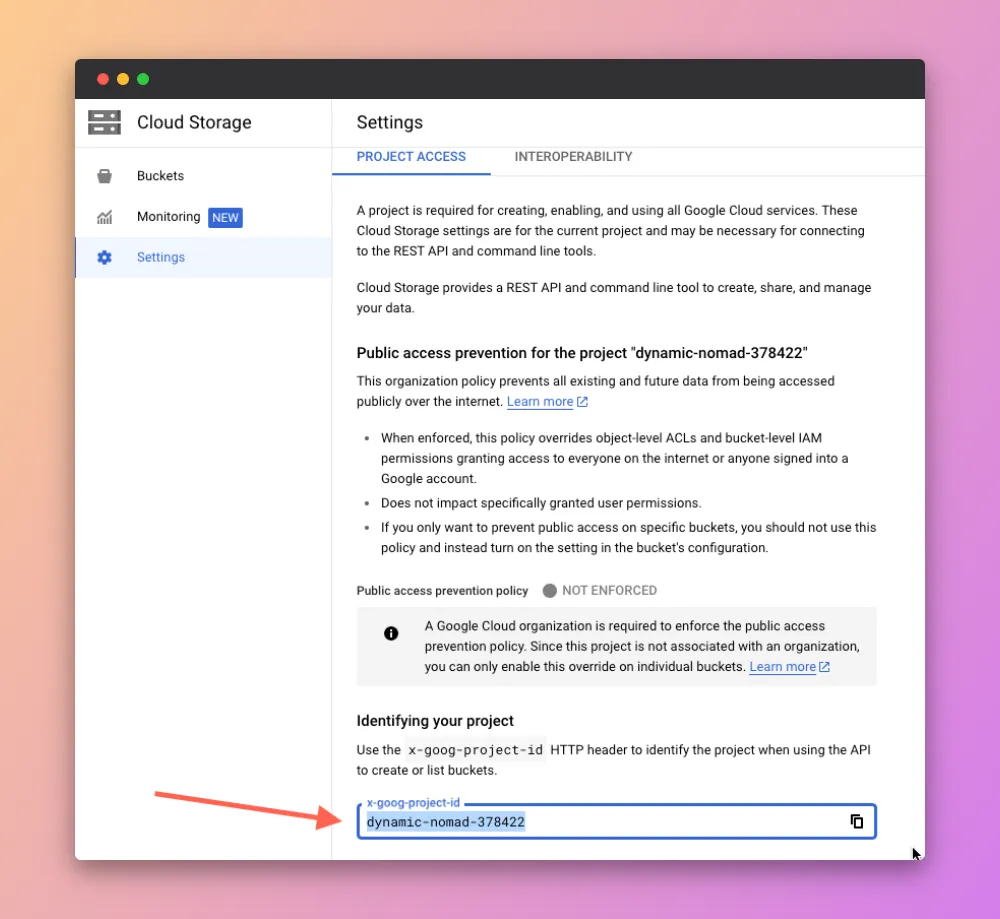
Your Bucket Name is just the actual name of your bucket. Here’s how to find Project Id.
- Project ID: Click Settings, and copy the x-goog-project-id field
Github link for completed code
I also have a github link https://github.com/swekage/google-translate-glossary where I show all of the completed code, including create, delete, and actually using the glossary to translate words.
Congrats! Halfway done chopping!
Create the glossary resource so Google Translate can use it. (5 minutes)
We have the glossary.csv file now in Cloud Storage, but we also need to let Google Cloud know that file can be used as a glossary. To do this, we need the following information from Google Cloud:
- gsutil URI: Find the first part of the URI in the Configuration tab of the bucket you created. The full URI will also include the file name at the end, so like this for example: gs://test-translate-glossary/glossary.csv

With this info you can start writing the code to create the glossary resource. Here is some example code showing a create glossary function. You’ll just need to insert your own GLOSSARY_URI, and then you can call the createGlossaryResource function.
const path = require('path');

// this is where you decided to download your service account credentials
const SERVICE_ACCOUNT_CREDENTIALS = path.resolve('./translate-api-credentials.json');

// You must set this environment variable before you require the
// @google-cloud/translate npm module to authorize properly
process.env.GOOGLE_APPLICATION_CREDENTIALS = SERVICE_ACCOUNT_CREDENTIALS;
const { TranslationServiceClient } = require('@google-cloud/translate');
const translationClient = new TranslationServiceClient();

// insert your own PROJECT ID here
const PROJECT_ID = 'dynamic-nomad-378422';

// insert your own GLOSSARY_URI here
const GLOSSARY_URI = 'gs://test-translate-glossary/glossary.csv';

// you can decide your own GLOSSARY_ID. this is used if you need to update/delete
// the glossary resource
const GLOSSARY_ID = 'my-glossary';

// GLOSSARY_LANGS are the languages your glossary supports. These are the
// languages in the column headers of your glossary
const GLOSSARY_LANGS = ['en', 'es'];
const LOCATION = 'us-central1';

async function createGlossaryResource() {
  const request = {
    parent: `projects/${PROJECT_ID}/locations/${LOCATION}`,
    glossary: {
      languageCodesSet: {
        languageCodes: GLOSSARY_LANGS,
      },
      name: `projects/${PROJECT_ID}/locations/${LOCATION}/glossaries/${GLOSSARY_ID}`,
      inputConfig: {
        gcsSource: {
          inputUri: GLOSSARY_URI,
        },
      },
    },
  };
  console.log('Creating glossary resource...');
  // Create glossary using a long-running operation
  const [operation] = await translationClient.createGlossary(request);

  // Wait for the operation to complete
  await operation.promise();

  console.log('Created glossary:');
  console.log(`InputUri ${request.glossary.inputConfig.gcsSource.inputUri}`);
}
Call Google Translate with the glossary. (5 minutes)
Now that Google Cloud has a record of your glossary, you can try translating using the glossary. Here’s some example code of the translation functionality.
async function translateTextWithGlossary(stringOfText, sourceLanguageCode, targetLanguageCode) {
  const glossaryConfig = {
    glossary: `projects/${PROJECT_ID}/locations/${LOCATION}/glossaries/${GLOSSARY_ID}`,
  };

  const request = {
    parent: `projects/${PROJECT_ID}/locations/${LOCATION}`,
    contents: [stringOfText],
    mimeType: 'text/plain',
    sourceLanguageCode: sourceLanguageCode,
    targetLanguageCode: targetLanguageCode,
  };

  // only use the glossary if it includes the langages we are translating to and from
  if (GLOSSARY_LANGS.includes(sourceLanguageCode) && GLOSSARY_LANGS.includes(targetLanguageCode)) {
    request.glossaryConfig = glossaryConfig;
  }

  const [response] = await translationClient.translateText(request);

  let translations;

  // if we used the glossary, the translations will end up in response.glossaryTranslations
  // otherwise, it will end up in response.translations
  if (response.glossaryTranslations.length) {
    translations = response.glossaryTranslations;
  } else {
    translations = response.translations;
  }

  for (const translation of translations) {
    console.log(`Translation: ${translation.translatedText}`);
  }
}
And with that, you should be able to call the Google Translate API using glossaries!
Bonus: What if I need to make changes to the glossary? (5 minutes)
To update your glossary, you’ll need to
replace the glossary.csv file in your Cloud Storage bucket with the new one
delete the original glossary resource
create the new glossary resource using the code
You can replace the glossary.csv file manually in Cloud Storage by deleting the original, and then uploading a new file, or by just using the upload code that was shown before.
Sample code:
const { deleteGlossaryResource, uploadNewGlossaryFileToBucket, createGlossaryResource } = require('./google');

async function updateGlossary() {
  try {
    await deleteGlossaryResource();
  } catch (err) {
    console.error('Failed to deleteGlossaryResource', err);
    console.log('This may not be an issue because it could have never been created or it was already deleted.');
  } finally {
    try {
      await uploadNewGlossaryFileToBucket();
      await createGlossaryResource();
    } catch (err) {
      console.error('Failed to upload or create glossary', err);
    }
  }
}

updateGlossary();
where deleteGlossaryResource could look like this:
async function deleteGlossaryResource() {
  const request = {
    parent: `projects/${PROJECT_ID}/locations/${LOCATION}`,
    name: `projects/${PROJECT_ID}/locations/${LOCATION}/glossaries/${GLOSSARY_ID}`,
  };
  console.log('Deleting glossary resource...');
  // Delete glossary using a long-running operation
  const [operation] = await translationClient.deleteGlossary(request);

  // Wait for operation to complete.
  const [response] = await operation.promise();

  console.log(`Deleted glossary: ${response.name}`);
}
Phew! We made it. It wasn’t easy, but that’s because it’s a Google product amirite? Just kidding but congrats on finishing the guide, and thank you for getting this far!
If there are any questions or if you want me to do a guide like this for something else, feel free to drop a comment! I respond to every comment, which is easy for me to say since I don’t get much comments right now.